Adjusting Screen Resolution
You may want to adjust screen resolution from time to time in order to increase battery life or because your machine is running a little slowly because of high processing power needed.
To adjust the resolution:
- In the Start Menu type in "Resolution"
- Select "Change the resolution of the display"
- Under "Resolution," choose from the available resolutions.


By default, your zBook will suggest the highest resolution (3840x2160). This resolution will give you the best images on your screen but will lower your battery life.
To increase battery life, 100% scaling at 1600x900 resolution may be a good option to try. You may need to sign out of Windows and sign back in for the scaling settings to change properly.
Customizing the Start Menu
The right side of the Start Menu can be arranged to display programs frequently used to increase productivity.
To pin programs to the Start Menu, simply drag programs from the main Start Menu list to the right side.
To unpin programs, simply right click the unwanted tile and select "Unpin from Start."

Formatting an External Hard Drive
Using an external drive between multiple operating systems can be tricky. As long as your hard drive is formatted as exFat, you should have no trouble connecting to both Windows and MacOS.
NOTE: REFORMATTING YOUR DRIVE WILL ERASE ALL CONTENT CURRENTLY ON IT.
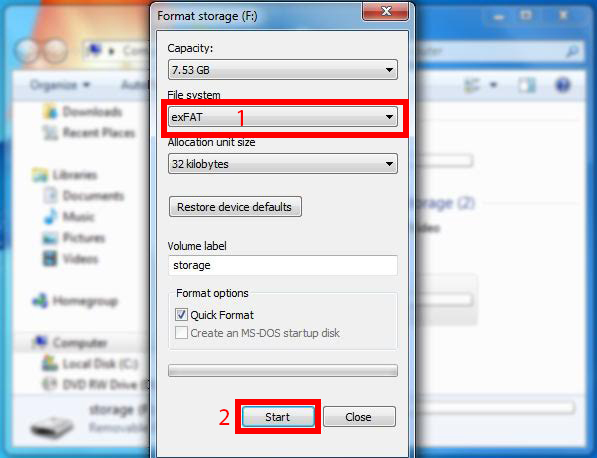
To format an external drive in Windows:
- Plug in your external drive to a Windows machine
- In Windows Explorer, right click on the drive and choose "Format"
- In the File System dropdown menu, select "exFAT"
- Click "Start"

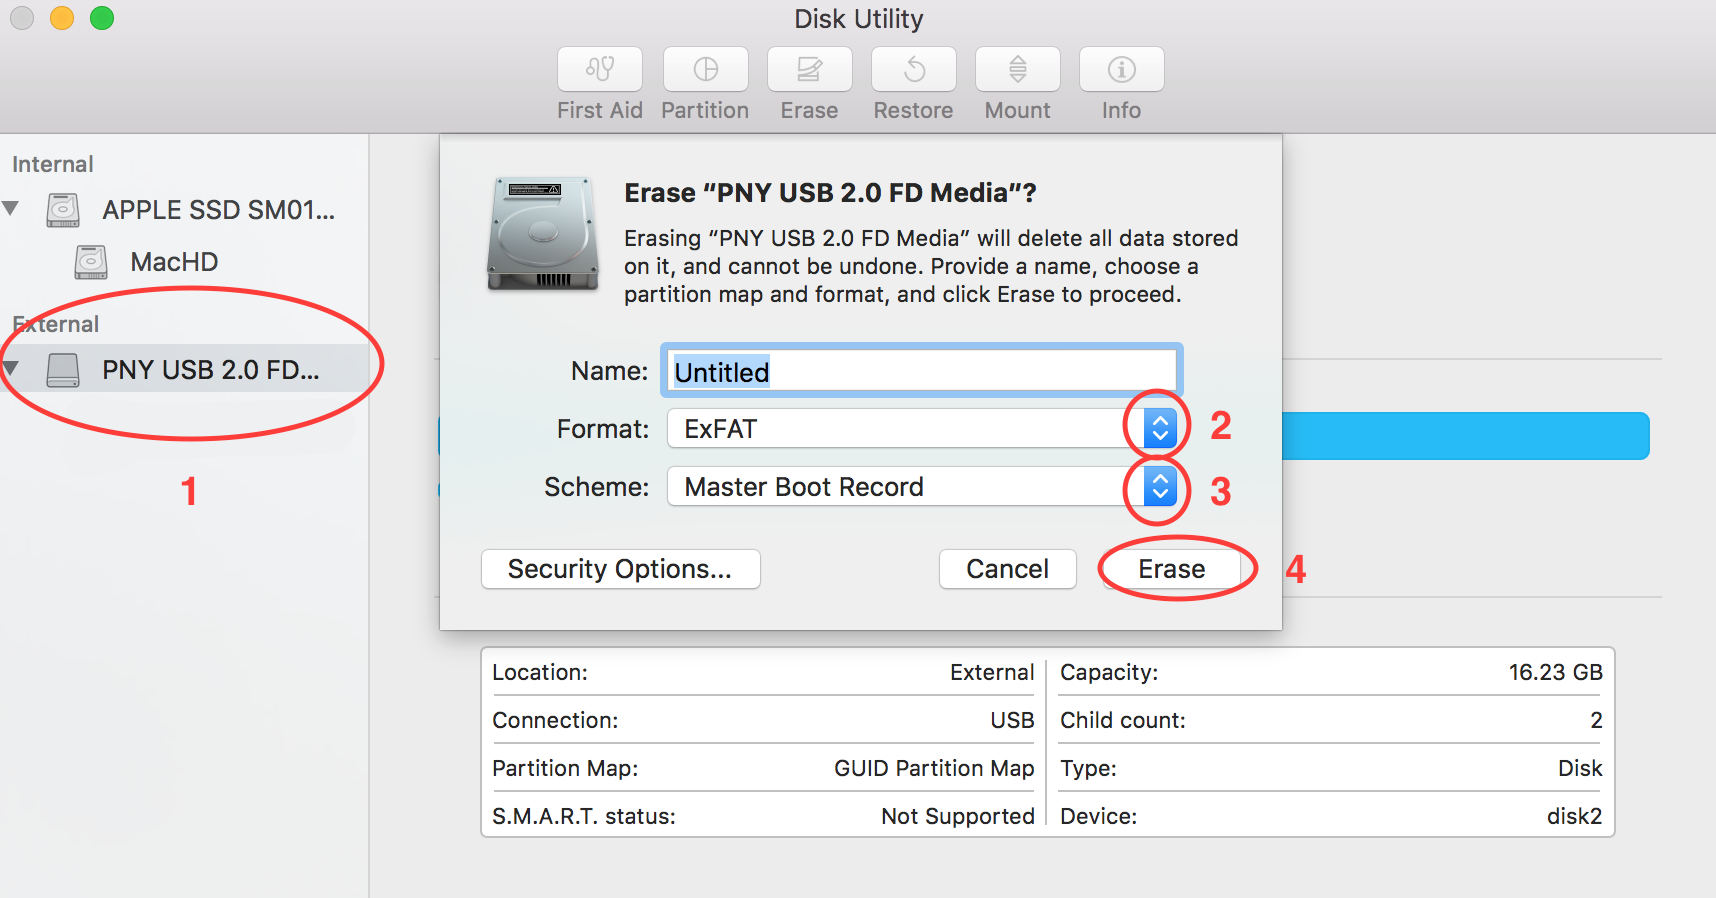
To format an external drive in MacOS:
- Plug in your external drive to a Mac
- Open Disk Utility located in /Applications/Utilities/Disk Utility.app
- Locate the drive in the left column under "External"
- Choose "Erase" from the menu
- In the "Format" drop down, choose "ExFAT"
- In the Scheme menu, choose "Master Boot Record"
Google Sync Setup
Google Sync is a great way to ensure that your files are always backed up and accessible from anywhere around the world (with a reasonably fast Internet connection)
To set up Google Sync, search for "Backup" in the Start Menu and select "Backup and Sync from Google."

When Backup and Sync opens, select "Get Started."

Do not try to log in from this window. Instead, select "Sign in with your browser instead" from the bottom of the window.

When the Ringling College portal pops up, log in with your Ringling username and password. Then click "Sign in."

Select "Allow" to allow Backup and Sync to access your Ringling College Google Drive account.

The next window will allow you to set what is synced with Google Drive. By default, Desktop, Documents, and Pictures are enabled. To prevent them from being uploaded to Drive, simply uncheck the boxes next to them.
Below that, you will have the option to select specific folders to auto-sync with Google Drive.
Ringling College currently provides unlimited Google Drive space to students. Because of this, we urge you to select "Original quality" for your uploads.
When you are finished customizing your upload settings, select "Next."

Now you have the option to set which folders are automatically synced from Google Drive to your zBook.
We strongly recommend that you choose specific folders, rather that sync your entire Drive so that you don't fill up your hard drive unnecessarily.
If you have a large Drive, it may take a couple minutes for Backup and Sync to load them all.
Once you've completed this section, select "Start" to allow Backup and Sync to start running.

Installing Printers
In order to install printers, you need to be signed in and connected to the GlobalProtect VPN. There should be a globe icon in the System Tray (lower right corner of your screen by default) You might need to click the Up icon to reveal all of the icons.
Once you are connected, download drivers here.
You might also encounter trouble installing depending on how you have set your security settings such as Windows Defender, or a 3rd party anti-virus or security software.
You may need to either add an exception to allow installing files from the ringling.edu domain or temporarily disabling a setting. For example, in Sophos, this setting is found by logging in to your Sophos account, choosing the "Protection" tab, then adding ringling.edu in the Website exceptions section. Be sure to only add websites that you trust since overriding this setting will allow you to download files that potentially could harm your computer.
Some setting changes will require you restart Windows to take effect. After downloading and clicking on the file you will likely see a message:
"Windows protected your PC. Windows Defender SmartScreen prevented an unrecognized app from starting. Running this app might put your PC at risk."
This is due to your Security settings. Simply Click on "More Info" and at the bottom of the screen you will see a new option "Run anyway" appear. Click this selection and it will start the installation of the printer.
As always, if you require further assistance, please let us know!
Locking/Unlocking Screen Rotation
Next to the system clock, in the system tray (bottom right by default) there is a square message bubble icon. Click or tap on it and press "Rotation Lock" to lock or unlock screen rotation.

Pen Settings and Programming Quick Keys
The HP Create Control panel is where you can calibrate your pen, and customize other settings.
It can be found in the start menu in the HP Create Control Panel folder. When you open it, you can program buttons, adjust pressure sensitivity, and create shortcuts on a per-app basis! To learn more about this check out a video we put together. The link below will take you to a YouTube video covering various topics and will jump directly to the portion talking specifically about how to customize pen and button settings! (will open in external link)

Powering Up and Shutting Down
To power on the HP Zbook, press and release the power button located in the top left side on the edge of the screen.
To shut down the HP Zbook, click the start button, then the power icon on the menu and choose "Shut Down". If you close the HP Zbook while it is only on battery power, opening it and pressing a key while only on battery power will not wake it. This is expected behavior. You will need to press the power button once to wake it from "Sleep" mode. If you are not going to be using the notebook for extended period of time it is best to fully shut it down.

Reinstalling Adobe Programs
The initial setup of your HP Z-Book notebook includes all of the software needed for your first year classes.
It is important to keep in mind that you are an administrator of the computer and IT does not prevent you from installing or uninstalling software.
We strongly advise you to not remove any of the software that was originally provided when you received your notebook.
We also strongly encourage you to get in the habit of doing routine backups of your important files. Your Ringling email account gives you unlimited cloud storage using Google Drive. Google Backup and Sync is also pre-loaded so you can sign in and setup automatic backups right away!
If software such as Adobe Photoshop, for example should need to be reinstalled we will need you to backup all your files and bring it to Notebook Services to be "re-imaged" Re-imaging is a process where the entire contents of your drive get erased, then the Windows operating system and all the included software get put back. This process typically takes less than an hour to complete.
Taskbar Pinning and Unpinning
To pin a program to the taskbar for quick easy access, simply open the program you want to pin, right click on the program icon in the taskbar and select "Pin to taskbar."

To unpin a program from the taskbar, right click on the program (it does not need to be currently open) and select "Unpin from taskbar."

Toggling Tablet Mode
Next to the system clock, in the system tray (bottom right by default), there is a square message bubble icon. Click or tap on it, then press the "Tablet mode" button to toggle between tablet and desktop modes.

Uninstalling Unnecessary Programs
You may notice, in your Start Menu, some built-in programs you may not want taking up space on your machine, like Candy Crush or Hidden City.
To uninstall these programs, simply right click on them in the Start Menu and select "Uninstall."
